Getting Started Video
What operating system does Tag That Photo work with?
Is Tag That Photo a cloud service?
What metadata format does Tag That Photo use?
Are the XMP tags written into the image?
Can I open TTP from the command line?
My virus scanner is blocking the installation
Tag That Photo is listed on many free download sites for Windows apps. These sites regularly test TTP for viruses in all the major virus engines.
The “safe to install” logo below comes from:
UpdateStar GmbH
Kreuzbergstr. 28
10965 Berlin
Germany

Do you support Macs or Linux?
What image formats does TTP support?
Not able to view Raw or HEIC images?
Can TTP import Picasa tags?
Can I do complex searches?
Can I use Dropbox, Google Drive or OneDrive?
Will TTP work on a Network or NAS drive?
How much does it cost?
Working with Adobe LR video
Working with MS Photo Gallery video
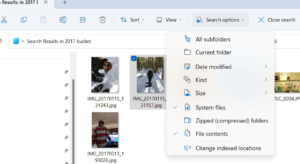
Searching in Win Explorer using tags
If you share photos with friends and family, they don’t necessarily need Tag That Photo to search their folders for People. By flipping the check mark on Explorer search options for “File Contents”, you can search for People names very easily. Click on “All subfolders” if you want a recursive search down a folder tree.
See example images below: